.jpg)

The average home consumes lots of fresh food but produces very little. Growing your own food can seem difficult when you have yet to buy a bunch of seeds and equipment. But what if you could grow food from what is in your fridge or pantry right now?
This article is going to show you exactly that, explaining how to regrow 10+ plants from food scraps. You can grow fresh new leaves or even entirely new plants from the parts of plants that we don’t eat anyway and would otherwise go to waste!
Note: Some of the methods require plant pots and soil. A loose potting soil is best for all of the methods. You’ll also need different sized pots, however you can consider up-cycling or re-using plastic ice cream tubs and other containers.
Why grow from kitchen scraps or ‘waste’?
Fresh nutritious produce can be expensive and often runs up a significant portion of our grocery shopping costs. Luckily there are ways we can reduce this cost whilst experimenting with growing our own food at home.
Growing with parts of plants normally considered as waste does an amazing job at shifting our perspective and deepening our relationship with the cycle of growing food. Items we think of as waste, like a deflated, dry garlic clove can grow into an entirely new garlic bulb. There is also definitely a certain joy in harvesting your own food after patiently watching it grow!
Using food scraps to grow food is also a great way to contribute to tackling the important issue of food waste. Did you know that UK households waste 6.6 million tonnes of food every year? Additionally, if global food waste was a country, it would be the third largest emitter of greenhouse gases! (LFHW) When we consider the ongoing need to increase food supplies as populations increase, tackling food waste is clearly essential. Read more about the environmental impact of our food system and why urban farming is part of the solution here.
The following methods are simple ways to reduce our food waste in a productive way!
How to regrow plants from food scraps
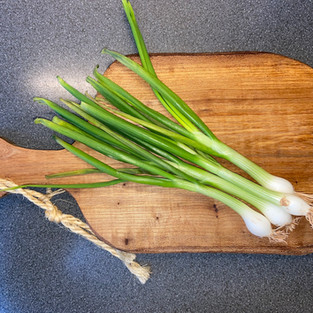
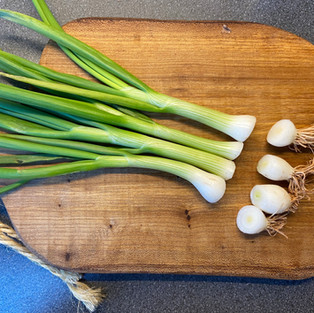
1. Spring Onions
Perhaps the easiest of all of the methods in this article, Spring Onions can be regrown from their white root bases, growing only in water.
Cut the green top of the spring onion, leaving 3-5cm of the white root base intact.
Place this section into a shallow jar and submerge half of the plant in water.
Leave in a sunny spot and change the water every other day.
Harvest directly from the jar when ready.


2. Lemongrass
Stalks of lemongrass can be hard to come by and are sometimes quite expensive. You can get more bang for your buck by growing the ends in water.
Cut the top of the stalk off and use in your cooking, leaving 3-5cm of stalk remaining by the root section. Place this into a glass and submerge half of the stalk with water.
Place in a sunny location and replace water every other day.
You can harvest once the stalks are a size that you’re happy with.
Optionally, once the roots have grown you can place it in a pot with soil to grow further.
3. Lettuce
Lettuce leaves can be regrown by saving the root section at the bottom of the lettuce. This works best with hearts of lettuce like the Little Gem or Romaine varieties.

Cut lettuce leaves, making sure to leave 3-5cm of height on the root section
Place it in a bowl with enough water to submerge the roots (around 1cm)
Place this in a sunny position and change the water every other day.
After two weeks, when the lettuce sprouts new leaves and roots, you should plant it out into potting soil for prolonged growth.
Harvest when the leaves grow to baby leaf size (10cm).
4. Celery
Similar to the methods above, Celery can also be regrown from the base of a mature plant.
Cut all celery stems off, leaving 3-5cm of stem at the root section.
Place it in a bowl with warm water.
Place the cutting in a warm and sunny position and change the water every other day.
When the celery sprouts new leaves, you should plant it out into soil.
Harvest when the plant has large, healthy stalks.
5. Sweet Potatoes
Growing Sweet Potatoes can take a while but it's an exciting project. Unlike normal potatoes, if you plant a sweet potato directly into the ground, it will grow a plant but it won’t produce any more sweet potatoes.
We need to grow ‘slips’ to be able to crop sweet potatoes: these are sections of stems and roots, which grow from nodes on the potato. It is best to start this process indoors between February and April so they can be planted out after the last frost of spring.

Pierce toothpicks or wooden skewers into the middle of the sweet potato. Add lots of water into a jar and place it in with the top facing up (this is the pointy end).
Place in a sunny position and change the water regularly.
Roots, stems and leaves will begin growing from nodes called eyes on the potato over the next few weeks.
When the slips have grown substantial roots and stems, you can break it off the sweet potato and plant into soil indoors, potting it on as it gets larger.
Sweet potatoes are frost-sensitive so planting them outdoors is best done after any risk of late frost (end of May - June). Growing them in the ground during the summer is advised because the tubers can get quite big!
They can be harvested before the frost in the autumn or when leaves begin to turn yellow and die-back.
6. Ginger
Ginger is easy to grow from a spare piece of ginger from the supermarket, but it takes a while so you have to be patient. The part we eat is a 'rhizome', from which new shoots and roots can grow. Ginger grows best in the UK when planted between January and March.

First you want to use a piece of ginger which is at least thumb sized (about 5cm). Look for eyes on the ginger rhizome, these are small bumpy protrusions on the surface of the ginger. This is where the new shoots grow from, so ensure your piece has at least one! If you can spare a larger piece, you will have more growth and faster.
Prepare a pot with potting soil, it is important that you use a wide, shallow pot. New rhizomes will grow horizontally near the surface of the soil and need this space to spread out.
Plant the piece of ginger flat into the soil, cover with only 1cm of soil and give the pot a good watering once. It's best to maintain a humid, warm growing environment with lots of sun so these plants can thrive. Water regularly once shoots develop.
Move containers outdoors in the summer and remember to bring containers back indoors when temperatures drop below 10°C.
Harvest ginger when the leaves begin to turn yellow, this can be after 8-10 months.
7. Garlic
Forgotten garlic cloves that are too dry to be eaten are great for growing into new garlic bulbs. You can also use fresh cloves which will actually grow faster! Garlic is best planted between November and April.

Split a garlic bulb, leaving the skin on each of the cloves.
Place the garlic cloves upright into a shallow bowl or jar, with only the bottom of the clove submerged in water.
Place in a sunny position and replace the water every other day.
Once the shoots have grown you can finish here, by harvesting them. They are great in pesto or as garnishes for a fresh garlic flavour!
If you’d like to grow full garlic bulbs, you need to plant these sprouted cloves into soil. Use a deep pot which is at least 1ft wide and plant one clove per pot.
Full bulbs typically take 9 months to mature; they are ready when around half of the leaves turn yellow.
8. Carrot Tops
Unfortunately we can’t grow whole new carrots from cuttings but we can grow nutritious carrot tops quite easily. These leafy greens high in vitamin C and K are best blanched or sautéed.
Cut a 2-3cm section from the top of a carrot. Carrot cuttings have a tendency to rot which can have problems down the line, so dry it out over 3-4 days by leaving it in a cool, dry place.
Place the dry cutting into potting soil. Submerge most of the cutting in the soil so only the top of the carrot is exposed.
Place the pot on a sunny windowsill and water when the first 2-3cm of soil is dry.
Harvest the carrot tops after 2-3 weeks.
9. Plants with seeds
Many fresh food items we eat have seeds, there are some that we often consume (like tomato and chilli seeds) and ones we often throw out (like pumpkin or squash seeds). All of which can be used to grow new plants.

Experiment with growing seeds by separating them from any fleshy plant matter. This is easy with chilli peppers but is harder with pulpy foods like tomato. Removing the pulp reduces the chance of the seed rotting and for seeds like tomatoes allows germination to occur.
Dry your seeds by placing them onto paper towels for up to a week.
Plant seeds into soil and water regularly!
10. Herbs (Mint, Coriander, Basil, etc)
Most herbs can be grown from stem cuttings. It is a great way of growing multiple plants from one parent plant, constantly increasing your yields. This can be done all-year-round.

Take a ~10cm stem cutting from a herb plant below a node. A node is where the leaves grow from. Strip the cutting of all leaves apart from 3-4 on the top.
Place this cutting into a glass of water and place in indirect light.
First the roots will grow and then the cutting will show early signs of leaf/stem growth, it is then time to plant it into a pot of loose potting soil.
Repeat the process once your new plant has grown significantly.
Give it a go!
So if you have any of these vegetables, herbs or tubers at home, why not give one of these methods a try. They don’t take much work and you could be harvesting fresh lettuce leaves in a couple weeks or sinking your teeth into a longer project like growing garlic or ginger!
Share your pictures with us on instagram or send them to hello@squaremilefarms.com, we'd love to see your efforts! If you'd like to learn more about growing from home, check out our simple guides on how to grow microgreens or how to build a simple hydroponic system.
Sources:
Love Food Hate Waste (LFHW), 'Why save food'.
Square Mile Farms bring vertical, urban farming to city dwellers in their homes and in the workplace. We aim to bring people closer to food production and help to create a culture of healthy, sustainable living. Find out more about our offering and get in touch here with any queries. Sign up to our newsletter for tips on a healthy lifestyle and a round-up of relevant news. You can also follow us on social media to stay up to date with our journey, find us on Instagram, Twitter and Facebook. Why not join our online Urban Growing Community for advice on growing at home and much more!