How To Grow Plants In A Water Bottle!
- Dish
- May 21, 2020
- 6 min read
Updated: Jun 18, 2021

Today’s blog will show you how to make another super simple hydroponic system! I’ll show you how easy it is to start growing from home, whilst simultaneously upcycling your household waste, it's a win-win!
We'll cover what upcycling is, how wicking systems work and how to build one yourself. It should take less than 10 minutes to make one! This method is a great activity to try with kids because the system is simple to make and understand.
Why is it important to upcycle?
Upcycling is the creative reuse of waste materials as useful products with some environmental value. It is the opposite of downcycling, where once high quality materials are recycled into low quality ones.

So why plastic bottles? The UK uses over 7.7 billion plastic bottles every year, that's 150 per person per year according to Water UK. While many of us are trying to limit the amount of single-use plastic we use, a lot of us will still have a few plastic bottles in our homes (or bins) right now.
Upcycling is a great way for us to breathe new life into what otherwise would be thrown away. For this project, we can use the slow-degrading property of plastic to our advantage by making a growing system that could last years.
How does growing plants in a water bottle work?
This method of growing uses what we call a 'wick system'. It's the most basic of all hydroponic systems, meaning it's really easy to make. Like most hydroponic systems, it utilises a reservoir of water to feed and water the plants in lieu of soil.
It uses an absorbent wick to pull moisture into the growing medium, self-watering the plant(s). This works by capillary action: as moisture in the growing medium is taken up by the plant roots or lost to evaporation, the wick will continually pull water from the reservoir below, replenishing the moisture.
This method significantly reduces the amount of time you need to spend manually watering your plants, so if you're often forgetting to water your plants, this might be the project for you!
In my previous blog I showed you how to make a simple Deep Water Culture (DWC) hydroponic system. The DWC system, while simple, does require an air pump to keep the plants healthy, because it is an active system. The wicking system is even simpler: it’s a passive system, there are no pumps or electricity used to irrigate the plants. It’s very low maintenance, once you’ve made it you just need to refill the water when it runs low.
What can I grow in my water bottle system?
These humble growing systems can grow anything from lettuce to kale, or any herb you like. They can also be used as an intermediary home for larger plants like tomatoes and courgettes, which will be potted outside when large enough.
How to make a hydroponic system using a bottle
You will need:
1l, 1.5l or 2l plastic water bottle (with labels removed)
Spool of garden twine, cotton wick, or fabric strips
Craft knife/ scissors
Nail
Hammer
Seeds/Seedlings
Compost/Coco Coir
Perlite
Liquid nutrients/fertiliser (optional)
1. Prepare the bottles
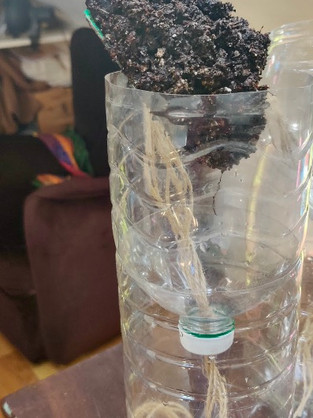
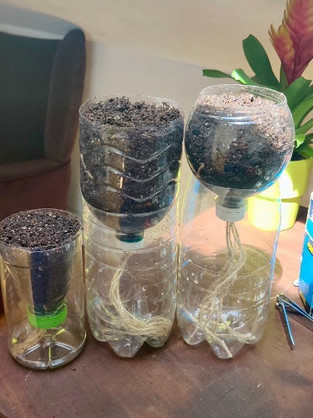
The first step is to prepare your plastic bottles. I used two 2 litre bottles and a 1 litre bottle. The top third of the bottle will be removed, turned upside down and filled with soil, while the bottom part of the bottle will be filled with water, acting as the reservoir (see the images below for a visual explanation). Where to cut your bottle will depend on its shape, but generally cutting it two thirds of the way from the bottom will work best.
Using a sharp screw, I poked a hole at the level that I wanted to cut and then proceeded to cut all the way around the bottle with a craft knife. Be careful to cut slowly as it is very easy for your knife to slip from the thin plastic bottle! I cleaned up the edges with a pair of scissors afterwards.
Turn the top upside down and check that it fits snugly into your reservoir (bottom part of the bottle). It was a perfect fit for my 2l bottles but I cut my 1l bottle a little too low, this means the reservoir will be very small and I’ll have to top up the water more regularly. Lesson learnt!
2. Make a hole in the bottle cap
The next step is to make a hole in the centre of your bottle cap, this is so we can feed through the wicking material to sit in the water. I used a nail and hammer to make the hole but you can use a drill too. Clean up any excess plastic with a craft knife.
3. Cutting and tying the wicks
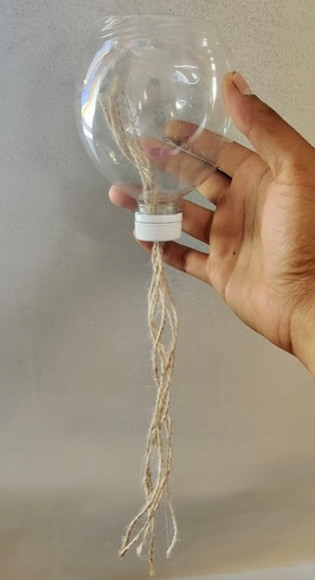
The material you use as a wick can be any absorbent twine or fabric. You can even use a strip of fabric from an old t-shirt or thick cotton wick if you’d like (bonus upcycling points if you do this!). I used garden twine, and because it is thin, I used 6 pieces per bottle. A general rule is to cut each piece of wick as long as the original bottle height. It is better to have extra wick than not enough as we want to make sure the plants get enough water.
After cutting 6 sections of wick, I tied them all together with a knot approximately in the middle. This keeps them all together but also prevents the wick from falling through the bottle cap. Thread the wicks through the bottle caps and then screw them into place.
4. Add your growing medium
The next step is to add your growing medium into the top of the system. I used a potting mix that I use in my garden (a mixture of multi-purpose compost and perlite), this should stay moist but not waterlogged. You can use any similar growing media including coco coir or peat. Perlite keeps the soil aerated and is essential in any potting mix.
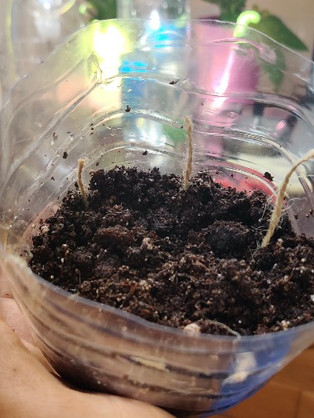
Carefully pour in small amounts of potting mix, making sure to distribute the pieces of wicking material evenly across the whole area. This will ensure even watering to the plant roots in all directions.
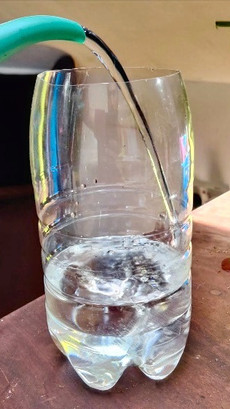
5. Fill the reservoir with fresh water.
Next, fill the reservoir (bottom part of your water bottle) with water, making sure it is below the inverted bottle cap. This is so the water doesn't have direct contact with the soil, which will cause waterlogging. Around 0.5-1cm from the bottle cap is a suitable gap.
If your plants are going to stay in this system for their entire life, you can add liquid nutrients into the water, these can be commonly found in garden centres and pound stores.
6. Sow or transplant into your new system
There are two ways you can plant into your new system, either by direct sowing or transplanting a young plant. I tried both methods.
Firstly, I sowed Swiss Chard and Wong Bok Cabbage seeds into two of the bottles. I did this by making a shallow hole in the potting mix, planting the seeds and then covering them with a very thin layer of soil.
I also planted a young seedling of Little Gem Lettuce into the third bottle. To do this, I made a larger hole in the potting mix, and put a pre-grown module with a lettuce seedling into it.
7. Water and place in a sunny spot
Your new water bottle growing system is almost there! All that's left to do is give the growing medium a good initial watering from the top to moisten it and then place it in a sunny position. Windowsills, balconies and conservatories are great locations for a system like this.
Top Tips
If you’re using nutrients in your reservoir try shading it by covering with paper or painting it so no light gets through this will prevent algae growth.
You can also try placing the top of a plastic bottle into an old glass jam jar. The system works in the same way but allows us to upcycle sturdy and durable old jars.
Give it a go!
It's as easy as that, I made three simple wicking systems made from plastic bottles and twine in under 30 minutes! So now it's over to you: if you have any plastic bottles which are going to waste be sure to try making a couple of these!
If you're planning on having a go at this, we'd love to see how you get on. You can tag us on Instagram @squaremilefarms or find our contact details below. Happy growing and don't forget to get in touch if you need any tips or advice!
Sources
Square Mile Farms bring vertical, urban farming to city dwellers in their homes and in the workplace. We aim to bring people closer to food production and help to create a culture of healthy, sustainable living. Find out more about our offering for homes and offices and get in touch here with any queries. Sign up to our newsletter for tips on a healthy lifestyle and a round-up of relevant news. You can also follow us on social media to stay up to date with our journey, find us on Instagram, Twitter and Facebook. Why not join our online Urban Growing Community for advice on growing at home and much more!
.jpg)


